
Introduction: Why Your Ergonomic Home Office Setup Matters
If your back aches by 10 a.m. or your neck throbs before lunch, your workspace is working against you.
More than 16% of workers globally now work remotely full-time, and the majority report musculoskeletal discomfort directly tied to a poorly designed ergonomic home office setup.
Unlike corporate offices, home environments rarely come equipped with ergonomic chairs, height-adjustable desks, or professional guidance on creating a proper ergonomic home office setup.
That is exactly what this guide fixes.
In the next 10 minutes you will get:
- A printable 12-point ergonomic home office checklist
- Step-by-step setup guidance for every part of your workspace
- Evidence-based posture and movement advice backed by OSHA, NIOSH, and peer-reviewed research
- A product comparison table with top-rated picks for every budget
Whether you are fighting back pain, dealing with eye strain, or simply want to work more comfortably — this home office ergonomics guide covers everything you need.
Click Here To Jump to Top Product Picks
Affiliate Disclosure: ErgonomicsCo participates in the Amazon Associates program. We may earn a small commission from qualifying purchases made through our links, at no extra cost to you. All recommendations are based on independent research.
Quick Ergonomic Home Office Checklist
Use this checklist every time you set up or audit your workspace. It takes under 5 minutes and covers the 12 highest-impact adjustments for a pain-free home office.
The 12-Point Ergonomic Setup Checklist
- Chair height: Feet rest flat on the floor or on a footrest. Thighs are roughly parallel to the ground.
- Lumbar support engaged: Your lower back has a gentle inward curve. No slumping or flattening.
- Armrest height: Elbows rest lightly on armrests with shoulders completely relaxed and down.
- Desk height: Elbows are at 90 to 110 degrees when typing. Wrists are flat or slightly declined.
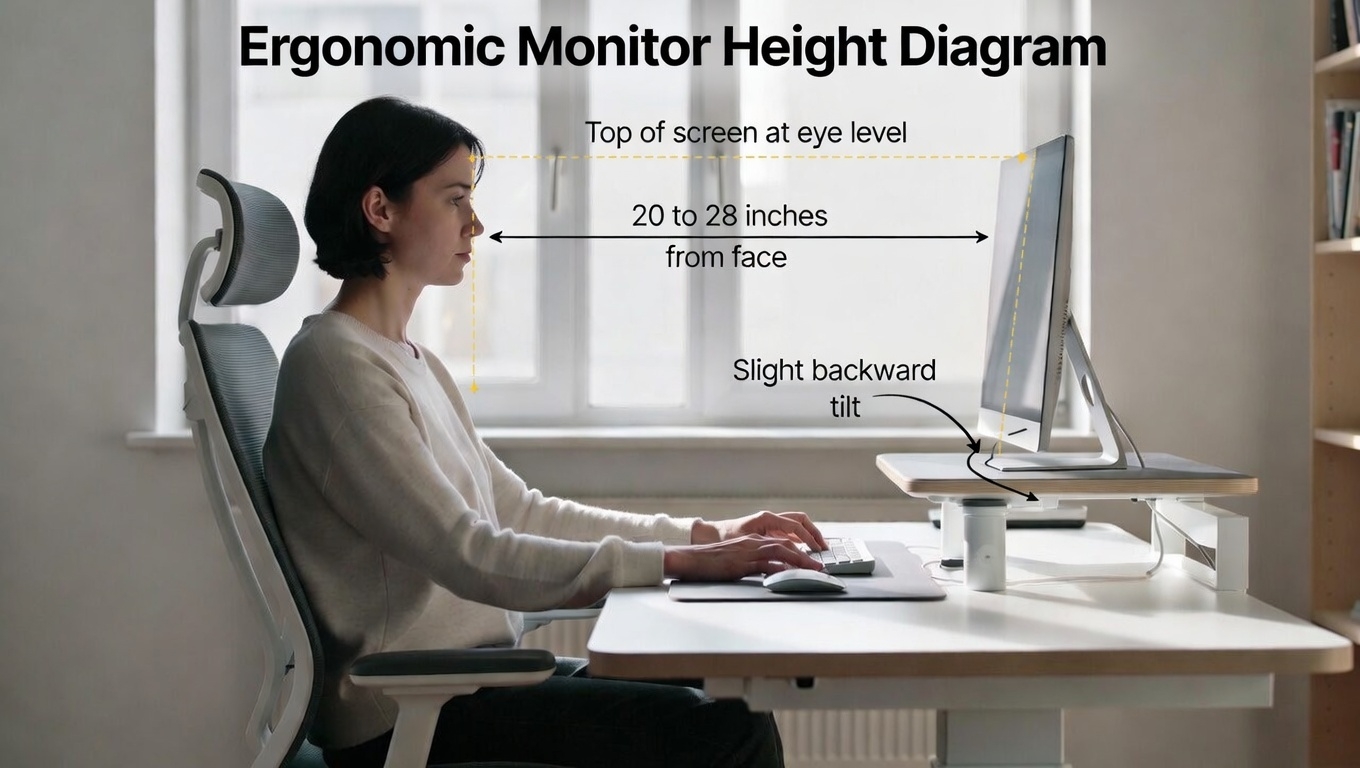
- Monitor top at or just below eye level: Screen center sits 15 to 20 degrees below your horizontal gaze.
- Monitor distance: Screen is 20 to 28 inches from your eyes — roughly arm's length.
- Monitor centered: No neck rotation needed to see your primary screen.
- Keyboard and mouse on the same level: Both are close to your body with no reaching.
- Wrists neutral while typing: No upward or downward bending at the wrist.
- Lighting optimized: No glare on screen. Light source is positioned to the side of your monitor.
- Movement break scheduled: A timer is set to stand or stretch every 30 to 60 minutes.
- Frequently used items within reach: No repeated twisting or extended reaching during the day.
Research from OSHA and the UK Health and Safety Executive (HSE) confirms that visual workspace reminders significantly improve workstation compliance over time.
The Right Chair: Choosing an Ergonomic Office Chair
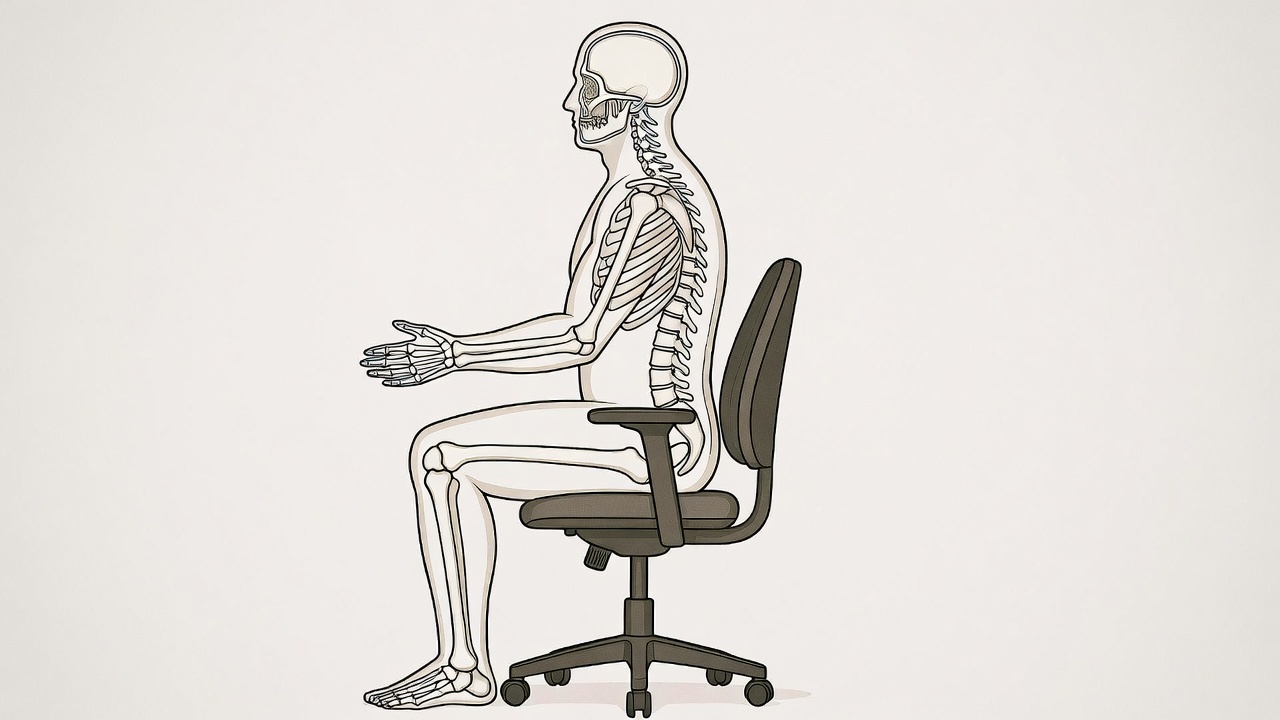
Your chair is the single most important investment in your ergonomic home office setup. A poorly fitted chair compresses spinal discs, shortens hip flexors, and strains your entire back and neck — often before you realize what is causing the pain.
Key Features to Look For
Adjustable lumbar support. It should fill the small of your back, roughly 3 to 4 inches above the seat. Adjustable lumbar support is non-negotiable for long work sessions. Fixed pads are often one-size-fits-few.
Seat height range. Ideally adjustable from 16 to 21 inches, which covers most adult body heights.
Seat depth. Leave 2 to 3 fingers of clearance between the seat edge and the back of your knees. Too deep means pressure on the back of your thighs and restricted blood flow.
Backrest recline. A recline of 100 to 110 degrees measurably reduces lumbar disc pressure compared to a rigid 90-degree upright position, according to a landmark study published in the journal Spine (Wilke et al., 1999).
Armrests. Height-adjustable at minimum. Ideally 4D — meaning they also move forward and back, adjust in width, and pivot — so your elbows stay supported without you shrugging your shoulders.
Seat material. Breathable mesh reduces heat buildup during long sessions. High-density foam holds its shape longer but can retain warmth.
Buyer Tips by Budget
Under $200 — Best for part-time remote workers. You get basic adjustability, adequate lumbar support, and entry-level mesh construction. Do not expect premium build quality, but you can absolutely find a functional ergonomic chair at this price. Read our Best Ergonomic Chairs Under $200
$200 to $500 — Best for full-time remote workers. Full adjustability, better materials, genuine ergonomic mesh options. This is the sweet spot for anyone sitting 6 to 8 hours per day. Read our Best Mid-Range Ergonomic Chairs
$500 and above — Best for heavy daily users. Premium brands like Herman Miller, Steelcase, and Secretlab. 10 to 12-year warranties, clinically considered design, and materials that last decades. Worth every dollar if you sit 8-plus hours daily. Read our Best Premium Ergonomic Chairs
Desk and Positioning: Sit-Stand Desks, Converters, and Correct Desk Height
How to Find Your Ideal Desk Height
You do not need a complicated calculator. Use this simple formula:
Your standing elbow height in inches, minus 10 inches, equals your ideal seated desk height.
For most adults between 5 foot 4 and 6 foot 2, this lands between 27 and 30 inches for seated work. For standing work, the target is your elbow height plus or minus 2 inches when your arms hang relaxed at your sides.
Sit-Stand Desks vs. Desk Converters
Standing desks became mainstream on the promise of eliminating the health risks of sitting. But more recent research from 2022 to 2025 paints a more balanced picture.
A 2024 systematic review found that sit-stand desks modestly reduce lower back discomfort but do not significantly change overall cardiovascular risk compared to sitting-only arrangements. The real benefit is movement variety — not standing itself. NIOSH recommends limiting continuous standing to no more than one hour per two-hour block, always alternating with seated work.
Important note: Prolonged standing carries its own risks, including lower-limb fatigue and foot discomfort. An anti-fatigue mat is essential for anyone standing more than one hour per day.
Full Sit-Stand Desk Pros: Seamless motorized transitions, memory height presets, large stable work surface at any height. Cons: $300 to $700-plus cost, 30 to 60 minutes of assembly, heavier footprint.
Desk Converter Pros: $60 to $250, no new desk needed, portable, works on any existing surface. Cons: Limited platform space when raised, can wobble at maximum height, raises the entire surface rather than just the keyboard.
[Read our Best Standing Desk Converters →] (internal link placeholder: /best-standing-desk-converter/)
Monitor and Screen Setup: Height, Distance, and Dual Monitors
Poor monitor placement is the leading cause of neck and upper-back pain in office workers — ahead of even chair quality, according to the OSHA Computer Workstations guidelines.
The Correct Monitor Position
Height. The top of your monitor should be at or just below eye level. When you look straight ahead, your gaze should naturally land on the top third of the screen.
Distance. 20 to 28 inches from your eyes. A quick shortcut: sit back in your chair comfortably, extend your arm — your fingertips should nearly touch the screen.
Tilt. Angle the screen 10 to 20 degrees backward to reduce the amount your neck bends forward.
Larger monitors. If you use a 27-inch or larger screen, push it slightly further back — 28 to 32 inches is better for 27 to 32-inch panels.
Dual Monitor Setup for Ergonomics
If you use two monitors equally, place them side by side with the center join aligned with your nose so there is no persistent neck rotation.
If one monitor is your primary screen, center it directly in front of you and angle the secondary screen at 30 to 35 degrees beside it.
Never turn your neck more than 35 degrees for extended periods. That angle creates real cervical strain risk over time.
Why a Monitor Arm Is One of the Best Ergonomic Investments
A monitor arm gives you far more adjustability than any fixed stand and reclaims 8 to 10 inches of desk depth. Look for VESA compatibility — either 75x75mm or 100x100mm — and a weight rating appropriate for your screen size. Most arms rated for 13 to 27 pounds cover screens up to 32 inches.
[Read our Best Monitor Arms Review →] (internal link placeholder: /monitor-arm-review/)
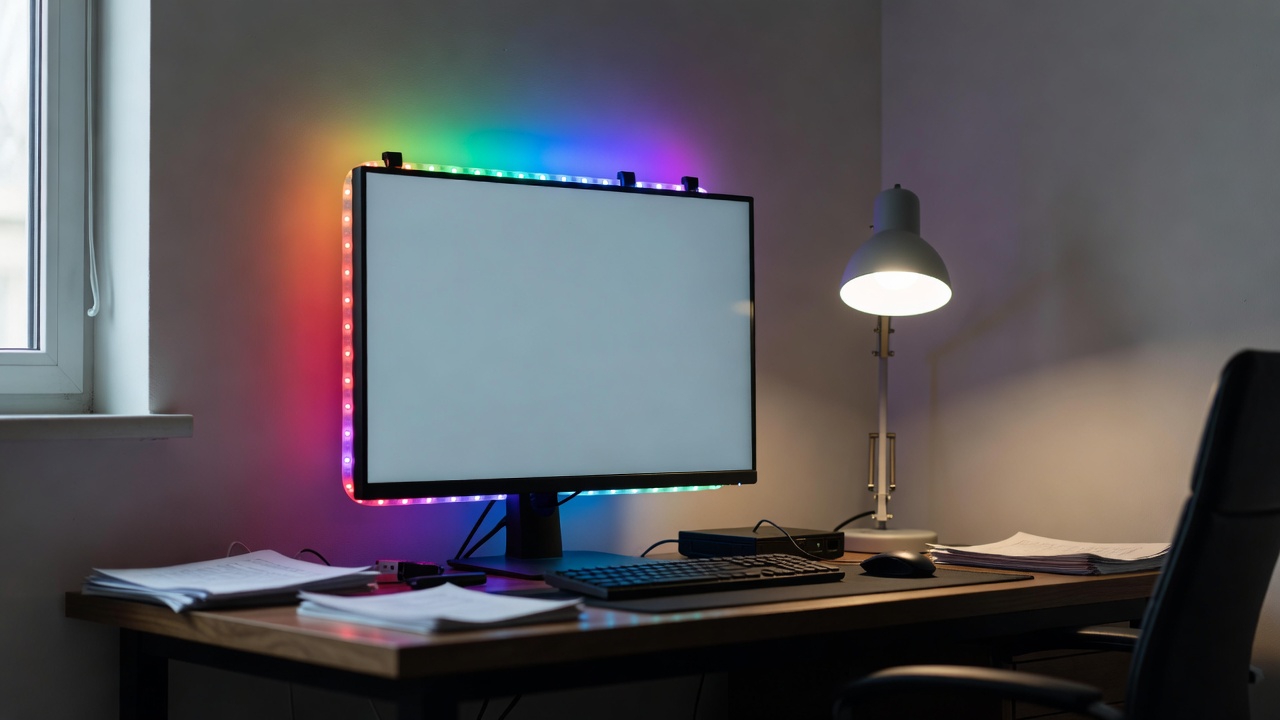
Anti-Glare and Bias Lighting
Position your monitor perpendicular to windows — never facing them and never with a window directly behind you.
Bias lighting, which is an LED strip placed behind the monitor matched to your screen's color temperature, reduces the contrast between your bright screen and a dark wall. This significantly reduces eye fatigue during long work sessions according to the American Optometric Association.
Input Devices: Ergonomic Keyboards, Mice, and Wrist Support
Standard keyboards and mice are designed for compactness, not neutral posture. That difference costs millions of workers each year in repetitive strain injuries.
Ergonomic Keyboard Options
Tented or split keyboards reduce the outward bend at the wrist, known as ulnar deviation. Brands like Kinesis and Logitech (ERGO K860) offer well-reviewed options. [VERIFY current availability before adding affiliate links]
Negative-tilt keyboard trays mount under the desk and slope the keys slightly away from you, keeping your wrists in a neutral or slightly extended position. This is the setup OSHA describes as the ergonomic gold standard for keyboard use.
Important wrist rest warning. Use a wrist rest only during typing pauses — not while you are actively typing. Using it mid-keystroke actually increases pressure inside the carpal tunnel. This is one of the most widely misunderstood points in home office ergonomics.
Ergonomic Mouse Options
Vertical mouse. Holds your hand in a handshake position, reducing forearm pronation and the strain that comes with it. The Logitech MX Vertical is a popular option. [VERIFY current availability]
Trackball mouse. Eliminates wrist movement entirely. Good for users with existing wrist or shoulder issues.
The key rule for mouse placement. The mouse must be at the same level as the keyboard and directly beside it. Never reach forward or to the side. Even a few inches of daily reaching adds up to significant shoulder and wrist strain over weeks and months.
Lighting and Reducing Digital Eye Strain
Digital eye strain affects an estimated 50 to 90 percent of regular computer users according to the American Optometric Association. The fix is simpler than most people expect.
Lighting Best Practices
Natural light positioning. Work near a window when possible, but keep your monitor perpendicular to it. A window in front of you causes glare on your screen. A window behind you reflects glare off your screen. Perpendicular is always the correct position.
Desk lamp color temperature. During work hours: 4,000 to 5,000K, which is cool white or daylight. This supports alertness and closely mimics natural daylight. In the evening: Switch to 2,700 to 3,000K, which is warm white. This reduces blue light exposure and supports healthy sleep.
Screen brightness. Match it to the ambient brightness of the room around you. Your screen should not be significantly brighter or dimmer than its surroundings.
The 20-20-20 Rule. Every 20 minutes, look at something 20 feet away for 20 seconds. This is endorsed by the American Academy of Ophthalmology as one of the simplest and most effective habits for reducing digital eye strain.
A note on blue light glasses. The evidence is currently mixed. A 2023 Cochrane Review found insufficient evidence that blue-light-filtering lenses reduce digital eye strain. Reducing overall screen brightness and using your device's Night Mode after 6pm is a more evidence-backed strategy.
Posture, Movement, and Microbreaks: The Most Underrated Ergonomic Fix
No chair, no desk, and no accessory fully compensates for staying completely still. Research consistently shows that movement frequency matters more than the quality of any single static posture. This finding was highlighted in a major review published in The Lancet in 2018 by Hartvigsen and colleagues.
The 4 Core Posture Principles
Neutral spine. Maintain your back's natural S-curve. The lower back curves inward gently, the upper back curves gently outward. No flattening and no exaggerated arch.
Head position. Your ears should sit directly above your shoulders. Research from Dr. Kenneth Hansraj, published in Surgical Technology International in 2014, found that for every inch the head moves forward, the effective load on the cervical spine increases by approximately 10 pounds.
Shoulders. Relaxed and down, not raised toward your ears.
Hips. Slightly higher than or level with your knees. Never lower.
Please consult a qualified physiotherapist or health professional if you experience persistent or worsening pain. The guidance in this article is educational and does not replace clinical assessment.
The Pomodoro Movement Schedule
Every 25 to 30 minutes: Take a 5-minute break. Stand up, walk to get water, or do 5 shoulder rolls and neck stretches.
Every 60 minutes: Take a full 2-minute standing or walking break.
Every 2 hours: Do a 5-minute movement routine — hip flexor stretch, spine extension, and calf raises.
Every 4 hours: Take a 10-minute walk outside or around your home.
5 Quick Desk Exercises — Under 3 Minutes Total
- Chin tucks — 10 repetitions. Gently retract your chin toward your spine. Counters forward head posture.
- Shoulder blade squeezes — 10 repetitions. Squeeze your shoulder blades together. Opens the chest and reverses rounded shoulders.
- Seated spinal twist — 30 seconds on each side. Gentle rotation to mobilize the thoracic spine.
- Hip flexor stretch — 30 seconds on each side. Step one foot back, push your hips gently forward.
- Calf raises — 15 repetitions. Stand and rise onto your toes. Boosts lower-limb circulation, especially useful during standing work.
Accessories That Actually Help
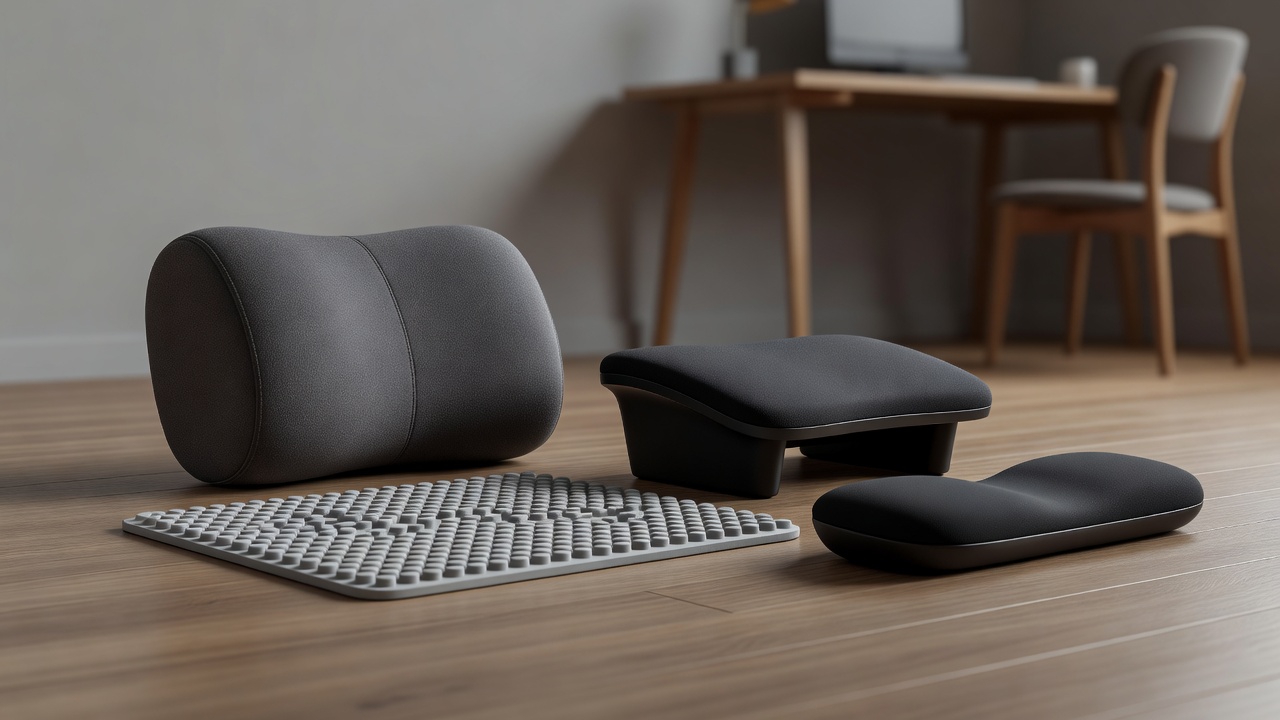
Not every ergonomic accessory on the market delivers real results. These ones do.
Lumbar cushion. Best for: Anyone with a non-adjustable chair. Key benefit: Restores your lumbar curve immediately. Portable and costs $25 to $55.
Footrest. Best for: Shorter users or anyone with a fixed-height desk. Key benefit: Reduces pressure on the back of the thighs and supports a neutral pelvis. Costs $20 to $60.
Anti-fatigue mat. Best for: Anyone using a standing desk. Key benefit: Measurably reduces lower-limb fatigue and discomfort during prolonged standing, according to NIOSH research. Costs $30 to $100.
Laptop stand. Best for: Anyone using a laptop as their primary device. Key benefit: Raises the screen to eye level. Always pair with an external keyboard and mouse. Costs $20 to $60.
Foot hammock. Best for: Small spaces where a floor footrest is impractical. Key benefit: Clips under the desk and provides a resting surface for your feet. Costs $20 to $40.
Cable management. Best for: Anyone with a cluttered desk. Key benefit: Reduces visual distraction, eliminates trip hazards, and makes your workspace feel calmer and more focused. Costs $10 to $30.
Small-space power combo: A laptop stand plus a compact Bluetooth keyboard plus a small vertical mouse creates a fully ergonomic workstation that fits in under 18 inches of desk depth.
Small Spaces and Non-Traditional Workspaces
Not everyone has a dedicated home office — and that is completely fine with the right approach.
Kitchen table — the most common temporary workspace. The kitchen table is usually too high for correct sitting ergonomics. Fix: add a firm seat cushion of 2 to 3 inches to raise your body height relative to the surface. Use a laptop stand and external keyboard. Set a 30-minute movement alarm.
Sofa or couch. Place a firm pillow behind your lower back and use a lap desk under your laptop. Limit these sessions to a maximum of 30 minutes. This is not a sustainable setup for full-time work.
Bed. Avoid extended work sessions in bed. If unavoidable, use a wedge pillow behind your back and a lap desk. Keep sessions under 20 minutes. Reclined positions significantly increase cervical and lumbar load compared to an upright seated position.
Traveling or temporary workspaces. A packable laptop stand such as the Roost V2 paired with a compact Bluetooth keyboard is a legitimate portable ergonomics kit for under $80.
Testing Your Setup: A Simple 1-Week Validation Guide
After making ergonomic changes, do not just guess that they are working. Measure it with this straightforward 1-week test.
Day 1 Baseline
Before making any changes, rate your discomfort on a scale of 0 to 10 in each of these areas. Zero means no discomfort and 10 means severe. Write the numbers down.
- Neck discomfort: ___
- Upper back discomfort: ___
- Lower back discomfort: ___
- Wrist discomfort: ___
- Eye fatigue: ___
- Afternoon energy level (1 to 5): ___
- Focus and productivity (1 to 5): ___
What Good Results Look Like
Your pain scores drop by 2 or more points in your highest-rated areas by Day 7. You feel fewer urges to shift and fidget during focused work. You experience less afternoon fatigue and eye tiredness. It is easier to maintain good posture throughout a full Pomodoro session.
When to Re-Evaluate
If scores show no improvement after 7 days, revisit your chair height, monitor position, and break frequency. These are the three most common culprits.
If you develop new pain in a different area, this may indicate overcompensation from your changes. Consult a physiotherapist.
If you experience any wrist or hand numbness, stop immediately and seek medical assessment.
Top Picks and Product Recommendations
Quick Verdict — Best Ergonomic Products of 2026
Best Overall Chair: Secretlab TITAN Evo Ergonomic — Full adjustability, premium build, serious ergonomics for under $700. Check current price on Amazon
Best Budget Chair: Hbada P5 Ergonomic — Best sub-$200 value. Mesh back, adjustable lumbar, great starter chair. Check current price on Amazon
Best Sit-Stand Desk: Flexispot E6 Pro — Dual motor, 330-pound capacity, rock-solid prosumer choice. Check current price on Amazon
Best Desk Converter: Flexispot EN1 — Converts any desk in minutes, large stable platform. Check current price on Amazon
Best Monitor Arm: BenQ BSH02 Single Arm — Clean design, smooth adjustment, built-in cable management. Check current price on Amazon
Best Lumbar Cushion: Everlasting Comfort Lumbar Pillow — Memory foam, dual straps, over 65,000 Amazon ratings. Check current price on Amazon
All price ranges are approximate as of early 2026. Always verify current pricing before purchasing.
| # | Product | Category | Price Range | ✅ Pros | ❌ Cons |
|---|---|---|---|---|---|
| 1 | Secretlab TITAN Evo (Ergonomic) | Best Overall Chair | $450–$700 | 4D armrests, adjustable lumbar + Magnetic Head Pillow, 5-yr warranty | Gaming aesthetic; heavy |
| 2 | Hbada P5 Ergonomic | Best Budget Chair | $150–$200 | Breathable mesh, adjustable lumbar, great sub-$200 value | Limited recline; basic arm padding |
| 3 | Flexispot E6 Pro | Best Sit-Stand Desk | $450–$600 | Dual motor, 275-lb cap, anti-collision, 4 memory presets | Long assembly; premium cost |
| 4 | Flexispot EN1 Converter | Best Desk Converter | $130–$200 | Gas spring, large platform, no tools needed | Keyboard tray not independent |
| 5 | BenQ BSH02 Monitor Arm | Best Monitor Arm | $80–$150 | Smooth VESA adjustment, cable channel, clean design | Single monitor only |
| 6 | Everlasting Comfort Lumbar Pillow | Best Lumbar Cushion | $30–$50 | Memory foam, dual straps, 65k+ Amazon ratings, portable | Can shift on slippery seats |
Full Product Details
1. Secretlab TITAN Evo Ergonomic Chair — Best Overall — $450 to $700
Originally positioned as a gaming chair, the ergonomic version delivers independent lumbar depth and height adjustment, a 4D armrest system, Magnetic Head Pillow and cold-cure foam that retains its shape across years of daily use. It earns the best overall title by delivering serious ergonomic features at a price well below Herman Miller and Steelcase.
Best for: Full-time remote workers who want premium ergonomics without a $1,000-plus chair. Buy the Secretlab TITAN Evo on Amazon
2. Hbada P5 Ergonomic Office Chair — Best Budget — $150 to $200
For under $200, this mesh-back chair offers adjustable lumbar support, a breathable backrest, and flip-up armrests — features that pricier brands routinely reserve for mid-tier models. It is the most practical entry point for remote workers not yet ready to commit to a premium chair.
Best for: Part-time to moderate full-time remote workers on a tight budget. Buy the Hbada P5 on Amazon
3. Flexispot E6 Pro Electric Standing Desk — Best Sit-Stand Desk — $450 to $600
The prosumer benchmark under $600. Its dual-motor frame, 330-pound lifting capacity, and anti-collision sensor make it one of the most reliable and feature-complete sit-stand desks in its price class. A long-term investment that pays off quickly in flexibility and daily comfort.
Best for: Serious home office users ready to invest in a full sit-stand solution. Buy the Flexispot E6 Pro on Amazon
4. Flexispot EN1 Desk Converter — Best Desk Converter — $130 to $200
For users who cannot or do not want to replace their desk, the M7B converts any surface into a sit-stand station in under five minutes. The gas-spring mechanism is smooth and stable, and the large keyboard platform keeps input devices on a consistent level surface.
Best for: Remote workers who want sit-stand flexibility without buying a new desk. Buy the Flexispot EN1 on Amazon
5. BenQ BSH02 Monitor Arm Single — Best Monitor Arm — $80 to $150
One of the most user-friendly monitor arms for home office newcomers. The clean aesthetic, built-in cable channel, and intuitive VESA adjustment make this a straightforward upgrade that immediately improves both ergonomics and desk real estate.
Best for: Anyone looking to reclaim desk space and get proper monitor height adjustment. Buy the BenQ BSH02 Monitor Arm on Amazon
6. Everlasting Comfort Lumbar Support Pillow — Best Lumbar Cushion — $30 to $50
The fastest and lowest-cost ergonomic upgrade on this list. Memory foam construction with dual elastic straps that grip most chair backs better than single-strap competitors. With over 65,000 Amazon ratings it is consistently one of the most reviewed ergonomic accessories on the platform.
Best for: Anyone stuck with a non-adjustable chair who wants immediate lumbar relief. Buy the Everlasting Comfort Lumbar Pillow on Amazon
Frequently Asked Questions About Ergonomic Home Office Setup
What is the most important part of an ergonomic home office setup?
Your chair is the foundation. No monitor arm or keyboard tray compensates for a chair that forces poor posture for hours at a time. Prioritize a chair with adjustable seat height and lumbar support before optimizing anything else in your workspace.
How high should my monitor be for home office ergonomics?
The top of your monitor should sit at or just below eye level when you are seated upright. The center of the screen should be approximately 15 to 20 degrees below your horizontal line of sight — roughly 3 to 4 inches below eye height for most adults. Position the screen 20 to 28 inches from your eyes.
Is a standing desk worth it for working from home?
Yes, for most remote workers — if used correctly. The real benefit is alternating between sitting and standing throughout the day, not standing itself. Research through 2024 and 2025 shows sit-stand setups reduce lower back discomfort compared to sitting-only arrangements. If your budget is limited, a desk converter between $130 and $200 delivers most of the benefit without replacing your entire desk.
How do I reduce back pain when working from home?
Start with three adjustments: chair height so your feet rest flat on the floor, lumbar support filling the curve of your lower back, and monitor height with the top at eye level. Then add movement breaks every 30 to 60 minutes. Research consistently shows that movement frequency is more protective against back pain than any single posture fix. If pain persists after 2 to 4 weeks of adjustments, consult a physiotherapist. This article does not replace medical advice.
What is the correct keyboard and mouse position for home office ergonomics?
Elbows should be at 90 to 110 degrees with wrists flat or very slightly declined. The mouse should sit at the same level as the keyboard and directly beside it — no reaching. Keep all frequently used items within easy forearm reach to prevent repetitive twisting and stretching.
Can I work ergonomically using just a laptop?
Yes, but only with the right accessories. Use a laptop stand to raise the screen to eye level and pair it with an external keyboard and mouse. This $50 to $80 combination solves the core ergonomic problem with laptops — you cannot simultaneously have the screen at eye level and the keyboard at the right height without accessories.
How often should I take breaks from sitting at my desk?
Every 30 to 60 minutes of continuous computer work. NIOSH and occupational health guidelines consistently recommend movement breaks at this frequency. Standing up, walking to get a glass of water, or doing 2 to 3 minutes of light stretching all count. The Pomodoro Technique — 25 minutes of focused work followed by a 5-minute break — aligns well with this guidance and works as both a focus and movement tool.
Do I need to spend a lot of money to set up an ergonomic home office?
No. The highest-impact changes are often free — adjust your chair height, stack books under your monitor — or low-cost at $20 to $50 for a lumbar pillow or laptop stand. A complete ergonomic upgrade covering a quality chair, monitor arm, keyboard, and core accessories can be done for $300 to $500 if you prioritize strategically.
Conclusion and Next Steps
Building an ergonomic home office setup is not a one-time project. It is an evolving practice that you refine as your body, your work style, and available tools change.
The most important thing you can do right now is start small and start today. Adjust your chair height. Raise your monitor. Set a movement timer. These zero-cost changes take three minutes and can make a noticeable difference within days.
When you are ready to invest, our product picks above give you a clear roadmap from budget-friendly upgrades to premium workstation builds — without overpaying for features you do not need.
Your 4-Step Action Plan
Step 1: Audit your workspace using the 12-point checklist above. It takes 5 minutes.
Step 2: Make the free adjustments first — chair height, monitor position, and lighting.
Step 3: Choose one upgrade from our Top Picks that matches your biggest pain point right now.
Step 4: Run the 1-week comfort test and track your scores.
Medical Disclaimer: The information in this guide is for educational purposes only and is based on publicly available ergonomics research and government guidance. It does not constitute medical advice. If you experience chronic or worsening pain, numbness, or any injury symptoms, please consult a qualified health professional.